
You send the QR code file to the printer. The code looks correct in the PDF preview. Two thousand flyers come back. The QR code that scanned flawlessly on your screen fails on paper. The print shop confirms the file printed exactly as sent. The problem was set before the file ever reached the printer.
The QR code generator at ToolCenterHub exports SVG and PNG formats with configurable error correction. The format and resolution decisions made at export time determine whether the printed code scans reliably. This guide covers each technical decision: file format, resolution, scanning distance, CMYK color, quiet zone, and how to test before approving the full run.
Why Print QR Codes Fail When the Screen Version Works Fine
A QR code on a monitor is rendered by software that draws mathematically sharp lines at whatever resolution the display supports. The same code converted to a low-resolution raster file and printed at a different size has blurry module edges. Phone cameras scanning a blurry print must work harder to determine where one module ends and the next begins. When the camera app cannot identify the module grid with confidence, it returns no result.
The five most common causes of print QR code failure, in order of frequency:
- File resolution too low — PNG exported at 72 or 96 DPI, then scaled up in the layout, prints with blurry module edges
- CMYK color conversion — near-black RGB modules convert to visible color in CMYK, reducing contrast below the scanning threshold
- Quiet zone removed — design software clips white border pixels from the placed image, destroying the mandatory blank margin
- Code too small for scanning distance — sized for hand-held viewing but used on a poster or display scanned from farther away
- Error correction too low — Level L or M modules fail when ink spread or minor print imperfections affect module boundaries
Identifying the cause before approving a print run takes ten minutes. Identifying it after 2,000 copies are delivered takes a reprint budget.
What Resolution Does a QR Code Need for Print?
The print industry minimum for sharp-edge artwork is 300 DPI at the final printed size. QR codes have an additional requirement beyond general sharpness: the individual modules must print with edges clean enough for a phone camera to parse the grid. Blurry module edges that human eyes perceive as "good enough" often fall below what scanning software requires.
For common print sizes, the pixel dimensions at 300 DPI:
| Final print size | Pixels needed at 300 DPI |
|---|---|
| 2.5 cm (1 inch) | 295 × 295 px |
| 5 cm (2 inches) | 591 × 591 px |
| 10 cm (4 inches) | 1,181 × 1,181 px |
| 20 cm (8 inches) | 2,362 × 2,362 px |
For large-format print (posters, banners, signage), large-format printers commonly work at 72 to 150 DPI at the full output size because print is viewed from a distance. Photos and gradients hold quality at that resolution. QR codes do not: their sharp module edges require vector format at any print size. A 72 DPI PNG on a banner will have visibly blurry modules that fail to scan regardless of how far away the scanner stands.
The practical rule for any print project: use SVG format. Resolution is not a factor with SVG because the format encodes geometry, not pixels. The printing system renders it at the native resolution of the output device.
SVG vs PNG: Which File Format to Use for Printing QR Codes
This is the single most consequential technical decision in the printing process.
| Format | For print | Why |
|---|---|---|
| SVG | Preferred for all print uses | Vector scales to any size without degradation; module edges render at device resolution |
| PNG (300 DPI, exact size) | Acceptable for fixed small prints | Must be placed at 100% scale; fails if scaled up |
| PNG (72 or 96 DPI) | Do not use | Blurs at any commercial print scale |
| JPG | Never use | Lossy compression introduces artifacts at module edges |
SVG files encode the QR code as geometric shapes. When the printing system converts the SVG to the press output, each module is drawn at the native resolution of that device, which is typically 1,200 DPI or higher on professional equipment. The result is perfectly sharp module edges at any physical print size.
A PNG file encodes the code as a fixed grid of pixels. If the file's pixel dimensions match the final print size at 300 DPI and the layout places it at exactly 100% scale, the print will be sharp. If the layout software scales the image at all, the pixel interpolation blurs the module edges. A 295-pixel PNG that looks correct on screen will appear blurry on a business card if the layout is configured to print at a size different from the file's native dimensions.
The QR code generator exports both SVG and PNG. For any print project, download the SVG.
The 10x Scanning Distance Rule
QR codes must be physically large enough for a phone camera to resolve individual modules at the distance from which users will scan. The rule: a QR code must be a minimum of one-tenth of the intended scanning distance in printed size.
| Intended scanning distance | Minimum QR code size |
|---|---|
| 25 cm (card or flyer held in hand) | 2.5 cm |
| 50 cm (desk, table, point-of-sale display) | 5 cm |
| 1 m (small poster, menu board) | 10 cm |
| 2 m (large poster, trade show display) | 20 cm |
| 5 m (street banner, retail signage) | 50 cm |
Most QR code sizing guidance covers only the business card case (2.5 cm minimum) and stops there. The same code placed on a poster that someone will scan while standing one meter away needs to be 10 cm square. A code that looks correctly proportioned in a design preview on a 27-inch monitor is frequently too small for its actual scanning context.
Restaurant table cards are a common failure point. The card sits 30 to 40 cm below eye level when placed flat. A 2.5 cm code passes the minimum threshold at that distance, but dim lighting, table glare, and older phone cameras reduce practical reliability. A 3.5 to 4 cm code gives useful margin without dominating the card design.
CMYK Conversion: K100 vs Rich Black for QR Code Modules
Most QR code generators produce output in RGB color. Commercial printing converts RGB to CMYK before press. This conversion is where contrast problems originate.
The K100 vs Rich Black Problem
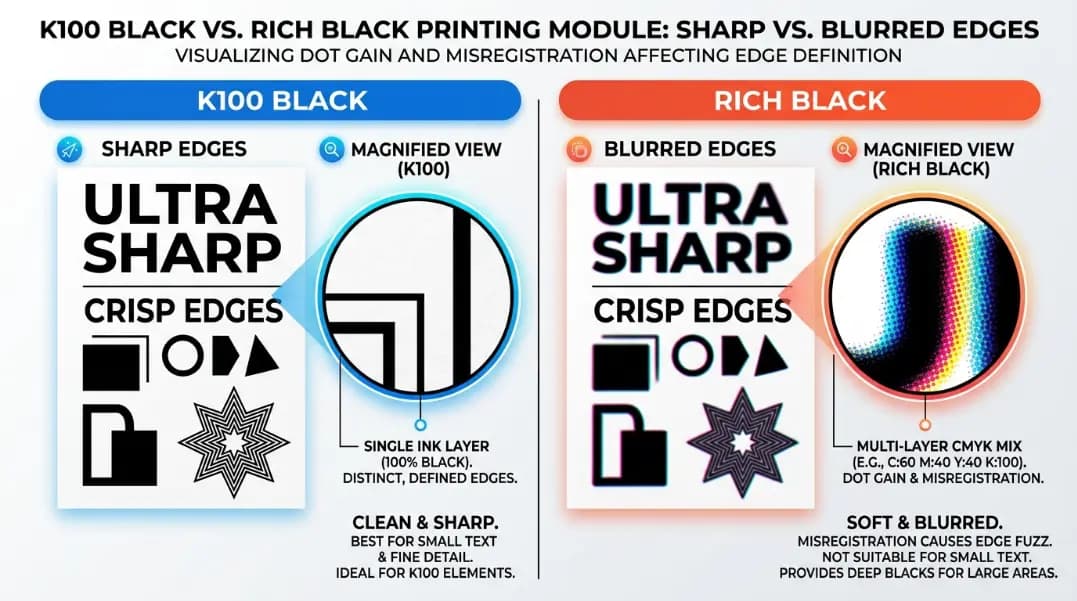
Pure black in print should be K100: 0% cyan, 0% magenta, 0% yellow, 100% black. Single-channel black produces the sharpest module edges because only one ink plate is applied. It is also the darkest achievable on press for fine detail.
Many design applications default to Rich Black when importing or converting RGB #000000: approximately 60% cyan, 40% magenta, 40% yellow, 100% black. Rich Black prints as a deeper-looking black on photographs and large text blocks. For QR code modules, it causes two specific problems:
- Plate registration error: Four ink plates must align precisely at press. Any plate-to-plate misregistration spreads the module edges by the width of the misalignment. At small module sizes, a 0.1 mm registration error measurably blurs the boundary between modules and the white quiet zone.
- Ink spread: More ink volume on press means more spread into adjacent areas. Rich Black spreads more than K100, which narrows the white spaces between modules and increases effective module density.
Set QR code module color to K100 (0C 0M 0Y 100K) in the CMYK design file. If the QR code is placed as an SVG, check the fill color in your layout application before sending to press and override it to K100 if the application has assigned Rich Black.
The Colored Module Problem
A dark navy module at RGB (0, 0, 80) appears near-black on a calibrated monitor. In CMYK, this typically converts to approximately 100% cyan, 80% magenta, 0% yellow, 30% black. The printed module is a visible dark blue. The contrast checker shows a contrast ratio of 7.4:1 between RGB (0, 0, 80) and white. The ratio between the printed CMYK equivalent and white may fall to 3.5:1 or lower depending on press calibration, paper stock, and ink coverage. The minimum reliable scanning threshold is 3:1, which means press variation can push a colored module below the threshold on some copies but not others.
The practical rule: use pure black modules (K100) for any QR code going to print. Color treatment should apply only to the background or surrounding design elements, not the modules themselves.
The Quiet Zone and How Design Software Removes It
The quiet zone is the blank white border surrounding the QR code pattern. The QR standard requires a minimum of 4 modules of quiet zone on all four sides. Without this margin, the scanning algorithm cannot locate the edges of the code pattern.
Design software removes the quiet zone in two ways, both without warning:
Automatic image cropping. When a PNG is placed in a layout application, many programs crop the image to the smallest bounding box containing non-white pixels. If the PNG was generated with the quiet zone as white pixels, the application treats those white pixels as empty space and removes them. The code appears visually correct in the layout, but the quiet zone has been stripped from the placed image. This does not happen with SVG: vector geometry includes the quiet zone as part of the shape definition, and layout applications cannot strip it without explicit user action.
Bleed and trim intersection. Print files include a bleed area, typically 3 mm on each edge, that is trimmed after printing. A QR code positioned close to the card or flyer edge may have its quiet zone intersect with the trim line. A code placed in the bottom corner of a business card with the quiet zone extending to the physical edge loses that portion of quiet zone during cutting.
Position the QR code so that its quiet zone has at least 3 mm of clear space beyond the trim line on all sides. The combined quiet zone plus margin should be visible on every edge in the final print preview before approval.
Error Correction Level for Different Print Contexts
Error correction allows a QR code to scan correctly when part of the pattern is damaged or obscured. Higher levels add redundant data at the cost of a more complex pattern.
| Level | Recovery capacity | Best for |
|---|---|---|
| L | 7% | Short-lived materials with minimal handling |
| M | 15% | Default — general indoor print materials |
| Q | 25% | Materials with occasional physical contact |
| H | 30% | Business cards, outdoor signage, banners |
For specific print contexts:
- Business cards and brochures: Level H. Physically handled objects accumulate creases, scratches, and surface wear over their useful life.
- Posters and indoor signage in protected locations: Level Q. Reasonable margin for press variation and ambient dust without the complexity overhead of Level H.
- Outdoor banners and exposed signage: Level H. UV exposure, moisture, and physical contact reduce pattern integrity over months.
- Event programs and single-use printed materials: Level M is acceptable. Short-lived materials under controlled conditions.
A higher error correction level produces a denser pattern. At the minimum print size for the application, verify that a Level H code still meets the resolution and size requirements. If a Level H code at 2.5 cm produces unreliable scans, increase the print size to 3 cm or shorten the encoded URL to reduce module count.
How to Test Before Approving the Print Run
A single test print identifies all five categories of failure before the full run. The test process:
- Request a test sheet from the same printer and press. A home inkjet print does not accurately replicate commercial offset or digital press output. The paper stock, ink type, and resolution all differ.
- Scan with three phones using their native camera apps. Include one older mid-range Android. These have the most variability in camera hardware and QR parsing libraries and will surface reliability issues that newer phones tolerate.
- Test in the intended lighting conditions. A restaurant QR code belongs in dim interior light. Outdoor signage belongs in direct sunlight and in shade.
- Scan from the intended distance. Hold the test print at the physical distance a user will actually stand, not the closest possible scan distance.
- Measure the quiet zone. After printing, place a ruler against the code and measure the white border. It should be at least as wide as 4 of the individual modules inside the pattern. If it appears narrower, the quiet zone has been clipped.
Common failure symptoms and their causes:
| Symptom | Likely cause | Fix |
|---|---|---|
| Scans on screen, fails on paper | PNG at wrong DPI or scaled in layout | Re-export as SVG |
| Scans inconsistently | Low error correction or borderline contrast | Regenerate at Level H; verify K100 black |
| Fails only on older phones | Quiet zone clipped or contrast near threshold | Check quiet zone; use contrast checker on physical swatch |
| Code scans but links to wrong URL | Static code with outdated destination | Regenerate with correct URL or switch to dynamic |
| Scan succeeds but page does not load | URL missing https:// prefix | Verify full URL with protocol in generator |
For business card-specific requirements covering minimum physical size, the static vs. dynamic QR code decision, and placement within a card design, the business card QR code guide covers those in detail.
For the full range of developer tools that support print and digital workflows, including the contrast checker used to verify module-to-background ratios, the developer section collects them in one place.


